Cut it up. Deep Revision: Part 4.

frosted leaves

This is Part Four of a 5-part tutorial called Deep Revision. This series is designed to help you prepare for The Little Bird Writing Contest.  

Read the rest of the Deep Revision series here:
Part OnePart TwoPart ThreePart Four (below)Part Five —    


One of the hardest things about attempting revision is the feeling of calcification that encloses a piece of writing once it’s been typed. It’s very convincing.

It gets even more solidified once you print it. It feels so good to see the printed pages, though, doesn’t it? Printing makes it feel real.

The problem is, to your lovely eyes, a printed first draft looks exactly like a printed polished final draft. It’s the same ink, the same font, the same line spacing. The printed draft can convince you that it is rock solid.

But it is not rock solid. It’s a draft. And you must be strong enough to break it like a geode to find the crystals within.

(Was that too much?)

Today’s homework will help you rediscover something new about that beautiful, exciting, possible story that is living inside your printed draft. It will also help you give yourself permission to change what’s there already, and make your story even more itself.

In other words, you’re going to break your story apart... without breaking it.


Homework:

You will need:

  • A printed copy of your story

  • A large, flat space (like the floor)

  • Three or four different colours of highlighters

  • Scissors

  • Tape

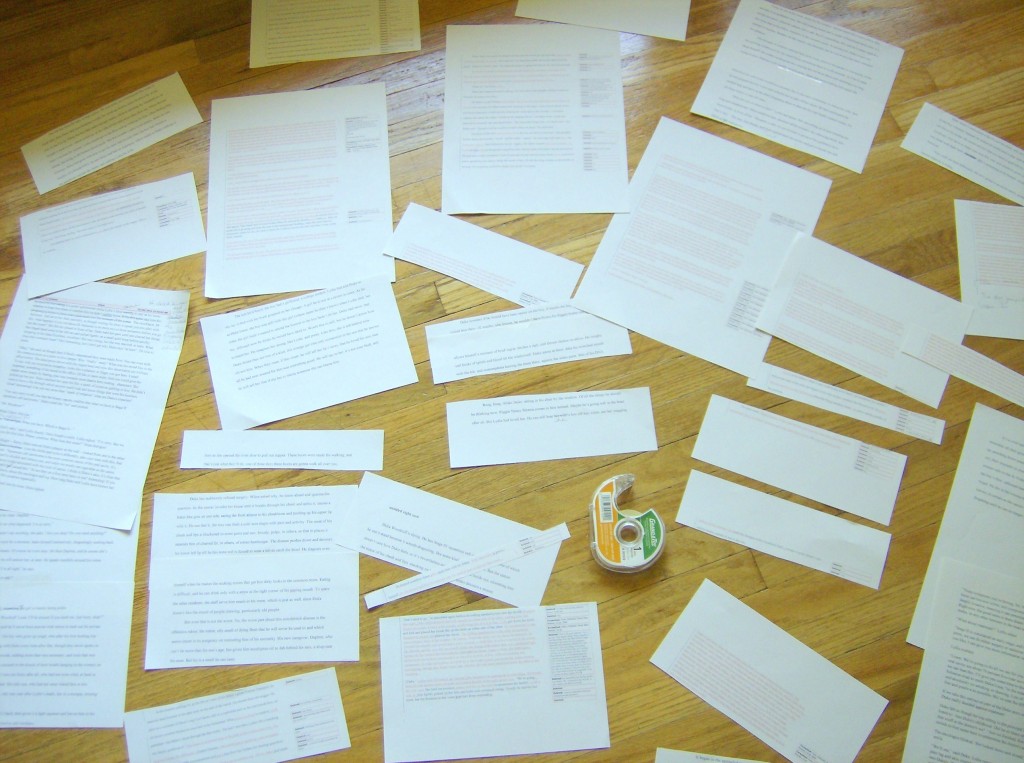
1. Spread all the pages out - one by one, so they aren’t overlapping - over a big table, kitchen counter, or (my favourite), the floor.

2. Think of the cornerstone elements that are particular for your story – characters, settings, time (if you use flashbacks), etc.

Use the highlighters to mark scenes and sections by colour, so you can see a visual map of your narrative structure. For example, if your story focuses on two main characters, you would highlight one character’s sections using yellow, and the other’s with blue. Or you can focus on prose: pink for scenes, green for exposition. Use your discretion and intuition here: only you know the strongest elements of your own story, and what needs the most balance.

3. Cut your scenes apart with scissors. Cut your paragraphs apart. This can be really fun or really scary, depending on who you are. Start with the problem areas – cut decisively and thoughtfully. I suppose you could also cut experimentally!

Ultimately, know that it’s all going to be there for you later. Your story isn’t going anywhere; you have the master file saved on your computer. So what’s the harm? CUT IT ALL UP.

It will look something like this*:

short story revision techniques

4. Step back for ten minutes. Make a cup of tea. Eat a few graham crackers.

5. Go back to your story puzzle on the floor, and see what happens when you move scenes around. Things you may notice as you shift the paper slices (this is not an exhaustive list, but it should pique your interest):

  • there’s a way more interesting place to begin the story

  • one character needs more page time to create balance in the story

  • your scenes are too short; you can push them further

  • the ending could really be at the beginning: in other words, you could structure your story in a better way

  • certain scenes are enhanced when they are placed directly next to other scenes – an emotional punch can be created without you mediating it

  • there is too much exposition and not enough scene

  • when taken out of context, there are parts of your story that you don’t love

  • you want more dialogue in there

  • most of the story takes place in flashback

  • there’s more drama when you take out your transitional paragraphs

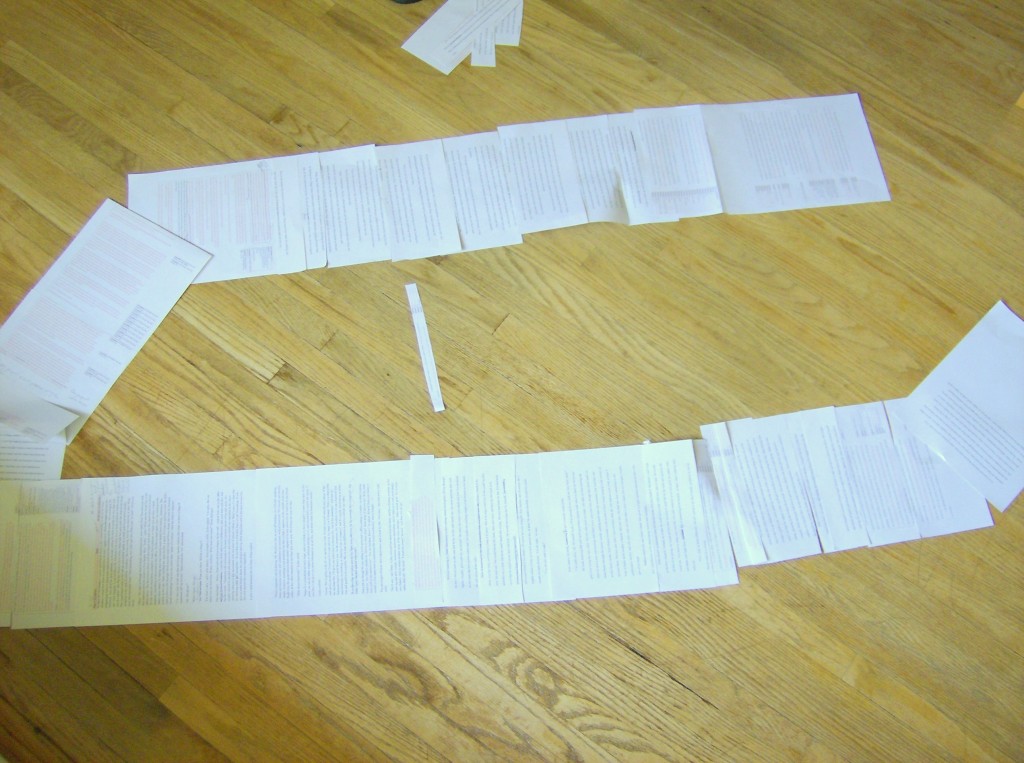
6. A new shape will start to form. Move the pieces into a new order, and tape them so they snake together in a scroll across the floor. You don’t have to move scenes just because you’ve cut them apart. And you don’t have to keep everything, either – you can leave parts out if they feel less than necessary. Just give your story structure again by taping it together.

You may also want to make notes on the scroll about new scenes that you want to write.

When you’re finished it should look like this*:

advanced short story editing

7. Go back to your computer and retype your adjusted draft. From scratch, please. I know that a lot of it is already written and won’t change. But trust me, your voice will be even more controlled, confident, and seamless when you type your story out again, all at once, on a new blank document.

You can consult your scroll as you type and write, but really try to feel the new version coming out as itself, and not just a transcription of what has come before. (see Deep Revision: Part 3 for a reminder about this process).

Now take a rest. That was a big deal.

Next week is the final installment of this series. There are still three weeks left to work on your Little Bird story entry. Enjoy this process, and let me know how it goes with the scissors and tape in the comments below, okay?

xo,

Sarah” width=


* Geode-cracking revision photos courtesy of Steph VanderMeulen, from her work with TA Gabriele Kohlmeyer, Summer 2012.    

Read the rest of the Deep Revision series here:
Part OnePart TwoPart ThreePart FourPart Five —    


Read for influence. Deep Revision: Part 3.
Read it backwards. Deep Revision: Part 5.

12 comments

Steph
 

I was resistant to this at first, but once I started cutting up, I began to have fun. I had to take a break after spreading the pieces all over the floor; it was overwhelming and somewhat scary to start. I worried at first about getting it right. So I read all the fragments, and the clearest were the ending paragraphs. I began backwards, and then, truly, things started to piece themselves together logically. Some pieces I ended up cutting up further. Some pieces were left out from the draft (though not discarded - I kept them in an envelope). Ultimately, this was a lot of fun, as was typing it all out again from scratch in the new order, because there were even further edits as I did that. The biggest thing for me, aside from the different order, was learning to play in the writing process. I struggled a lot with the need to get my story perfect in one draft. With this exercise, sometimes I untaped and moved and retaped. The idea was also to learn that multiple drafts are okay, even good; that impatience is a storykiller, that process is beneficial. I can undo if I need to, I am open to change, and my priority is not to finish now but to make the story the best it can be. I learned so much from this activity!
Read more
Read less
  Cancel
Juliet
 

Wow! That sounds like fun. I've been struggling with sequence as I use a lot of flashbacks. I'm going to try this exercise this weekend.
Read more
Read less
  Cancel
Caroline Frenette Master Intuitive Coach
 

Beautiful advice! This is giving me courage to tackle a project I have been scared to tackle BIG TIME. Ahhhh. This is me exhaling.
Read more
Read less
  Cancel
Margaret
 

Well, I'm sitting here, staring at my minimally cut up story and I do not want to cut out anything! I know we should "kill our babies' (who said it?), but I can't. Although there is a huge honking piece right in the middle that really needs to be trimmed down. I don't know how to do it!
Read more
Read less
  Cancel
Sarah Selecky
 

Hi Margaret! My advice: do it without knowing how, first. I know that sounds maddening, like a koan! The best way I know to approach it is to put your printed draft away and start from scratch, instead of cutting down something that's already printed in front of you. That might help. Good luck!
Read more
Read less
  Cancel
Writing Organization Activity | Education & Web 2.0
 

[…] not a new activity. Sarah Selecky suggests something similar in her blog, that students cut up a complete draft into par…. Doing the same thing with isolated sentences, however, removes the context clues. Can the essay […]
Read more
Read less
  Cancel
Miranda Morris
 

I love these deep revision suggestions, especially thinking of the second draft as continuing to be exploratory. Now, I do realise that these tutorials are aimed at short story writing, but I am writing a novel. Can you suggest ways of approaching the cutting up phase of, say, 150 sheets of paper, that would not be overwhelming or need me to hire a football pitch?
Read more
Read less
  Cancel
Sarah Selecky
 

Well, I'm still on the first draft of my novel, so I can't say from experience yet. I imagine it's the same thing, just more laborious, with lots of floor space. Maybe chunk it out, chapter by chapter? I'd love to hear from some novelists here and get their advice. Has anyone done this with a novel? How did you manage?
Read more
Read less
  Cancel
Laurel
 

I'm on my final (I think) revision of my novel. I love your cut-it-up approach, and yes, as Miranda notes, it's not really feasible with a long work. Here's what I found helpful: I made a list of all of my scenes, using a brief phrase or two to describe them; I color-coded these by character, then added symbols representing the major themes I wanted to develop. Seeing this graphic representation of who was where, the points at which characters interacted, and places where my themes were embedded (or not) enabled me to see that one of my two main characters needed more page time, that an important relationship between a main and a secondary character required a new scene for its further development, and that my themes could strengthened in particular scenes. It also led me to divide some scenes and move the parts so that the parallel lives of the two main characters are more interspersed. Thanks, Sarah; I'm new here and itching to start my new novel. I look forward to your prompts!
Read more
Read less
  Cancel
Amy Rutten
 

So great to know someone else does this! I came up with this idea on my own one day out of desperation, highlighting and all, because I needed to visually move it all around. It was a great exercise, but I was shaking my head the whole time. I couldn't imagine a 'real' writer going to such lengths to work out the kinks in a draft. Good to know it's not that obsessive!
Read more
Read less
  Cancel
Rebecca Villarreal
 

Sarah, the timing of this post is oracle-esque. Thank you!
Read more
Read less
  Cancel
Minal Hajratwala
 

Nice, clear description of the technique. I absolutely did the cut-up method with my 400-page nonfiction book, and I recommend it to clients all the time. It's even more helpful with a long work than a short one. In a poem or brief story, it's reasonable to save a copy and move stuff around in the computer, but for a book, it's often hard to conceptualize and remember the whole thing. I was working chapter by chapter, so whenever I reached a full draft of a chapter — about 30 pages — I printed it out, taped it to the wall (use removable blue painter's tape to avoid damage!) and started snipping and moving sections around that way. Some chapters would stay on the wall for a month or two before they were sorted enough to come down. It helps to have a long hallway—and no one else in the house who's bothered by it. I did need to make sure the pages stayed above cat level, though. :)
Read more
Read less
  Cancel

Leave a comment